Warning. This post will be retired at the end of 2016. Please save a copy of you need the instructions. To a scanner free 2017!!
Disclaimer: Technical Tutorial. This has nothing to do with the art of photography.
The Frontier is one of the most popular film scanners. Most people prefer it over the Noritsu for the colors it produces. I am not sure which one I like better. I think I kind of like them both. The Pakon also does an awesome job but doesn't seem to be used by any of the big labs. Probably because it's not supported by Kodak anymore...
In any case, I see big name labs recommending to go with the Noritsu when they want the extra resolution. The largest 135 scans they offer are:
- Frontier: 3342x4547
- Noritsu: 5035x3339
With a small tweak to the settings you can make the Frontier spit out 5374x3602 scans. That's even bigger than what the largest Noritsu outputs!
The Frontier is designed to always print at 300dpi and hence with increase of paper size you will increase the resolution of your scans. The above stated maximum is the maximum with default paper sizes. Adding a custom paper size you can easily scan at a higher resolution. I am assuming that there's no intend to print directly from the scanner, but only export the scan to file.
35mm frames are 2x3.
- 3/2 = 1.5 (this ratio will maximize your scan)
- 4547/3342 = 1.36 (lose 10% of your frame)
- 5376/3602 = 1.49 (lost 0.7% of your frame)
These scanners are designed for printing directly to standard paper sizes which are almost never in 2x3 format. In other words you, always have to crop something somewhere, so it's not worth losing sleep over. When I wet print in the darkroom I have to chose which part of the frame to crop, too. Note, the big difference is that I get to chose which part of the picture to crop. Getting my scans back in proper 2x3 format gives me this choice!
I've tried asking labs here in Tokyo to give me the full frame and was told that it's not possible. Anyhow...
Click on "Setup & Maintenance" and use password "7777" to get into SE2 mode (system engineer mode)
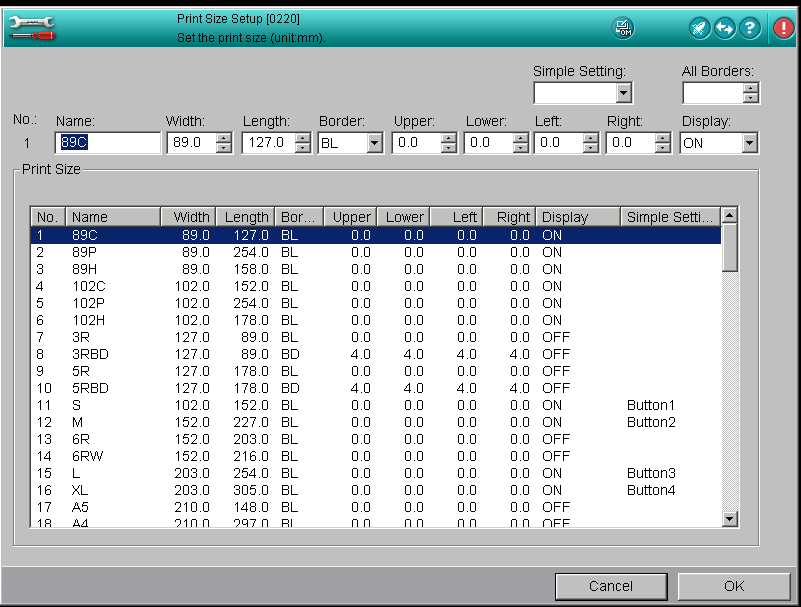
Go to "Print Condition Setup and Check" --> "Print Size Setup"
Here you'll find all default paper sizes. Display ON/OFF turns them on and off in the print/scan screen. See the custom buttons S, M, L, XL I created here. XL has settings W=203.0 L=305.0
If that's not big enough, see screenshot below. (scan time will increase substantially, especially for dense negs)
The XXL!! button I created will result in a 5376x3602 scan roughly. You can play around and try to tweak it even more and see how far it goes.
One thing to be aware of is that pushing the scanner to the above XXL!! resolution increases the scan time substantially! I would not do that for every single frame. This workflow and the above resolution was tested using the auto-feed carrier. With the manual carrier you can probably get even more.
Hopefully this is helpful to some people out there. I am by no means an expert when it comes to these scanners. The above workflow was put together with the help of a member of the Pakon scanner group on Facebook. Use it at your own risk.


